There is a lot of different game features and system interfaces to get used to when playing the game. Read through this page here to learn what all that stuff in the game window does.
|| || || || || || || || ||
Basic interfaces...
At the bottom of the game window, you'll see the main user interfaces. From it, you can open all game menus such as your inventory or quest logs. You'll also be able to see your character's vitals: health, mana, SD, and AG. There are 4 quick slots that consumable items can be assigned to, and 10 skill slots which attacking skills can be assigned to. You can assign items to the desired quick slot by dragging and dropping it to the slot, however the skill slots must be assigned through the 'skill menu.' To open the skill menu, click the button in the very center of all the interface (next to the skill slots). Finally, the experience bar at the very bottom keeps track of all the EXP Points you've gained. You have to fill this bar 10 times to increase your character level. There is a number next to the bar, on the right, which displays which bar you are on.

At the top of the game window, you may find a handful of other interfaces and tooltips. Starting in the top-left corner of the screen, you'll see the current server, the map name you are in, and the exact map co-ords your character is standing at in that map. You can click the server display to quickly change servers without needing to log out. Next to this information is the 'MU Helper.' The MU Helper is an auto-attacking function that can help you fight monsters and gain EXP over long periods of time. Status effects and buffs will appear in the top-center of the screen.
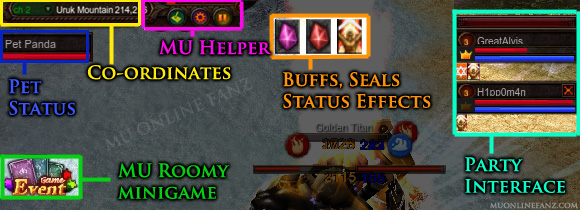
Other interfaces may appear from time to time as you progress through the game. When a quest becomes available, a pop-up menu will appear which displays quest tasks. You can click the tasks in this window to quickly move to the quest task location. If you join or create a party, you'll see details about your party in a pop-up type menu, which you can freely move around the screen. Additionally, when you equip a pet, mount, or muun, you'll see its health in a similar pop-up type menu.
During any mini-game entry period, small icons will appear which can be clicked to quickly enter the mini-game. There is also usually a square "event" button that is used for any current on-going promotional event.
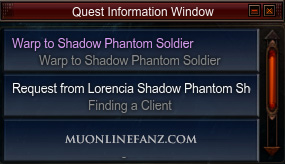
Quest window example...
Mini-game notification icons...
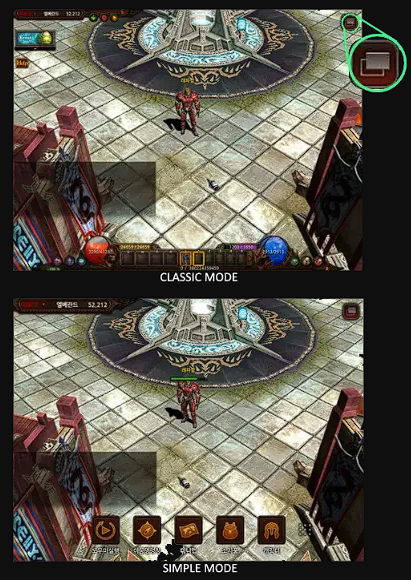
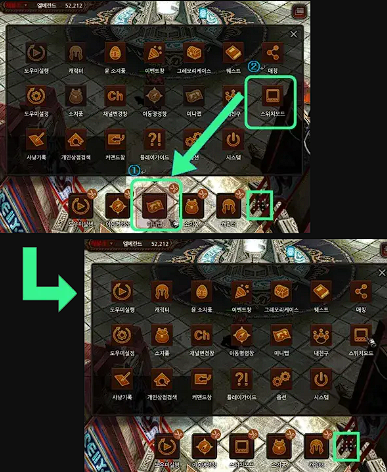
Simple interface toggle... #
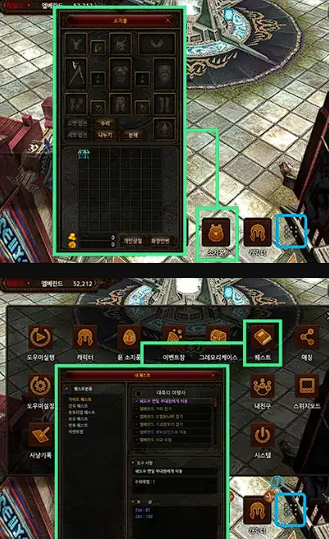
The interface can be switched to 'simple mode.' You can edit the buttons to customize your interface layout...
Character name display... #
A character's name is displayed in yellow text directly above the character. If a character is in a guild, their guild name appears above their name in green text. If a character is in a 'gens,' their gens' symbol will appear to the left of the character name display. If a character has a pentagram item equipped, its elemental type is displayed to the right of the character name display. When a character opens a 'personal store' the character name display changes to show a shop name instead.
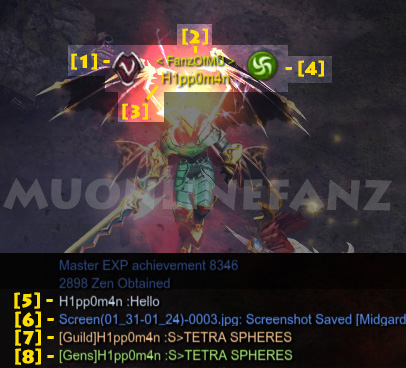
Character name display...
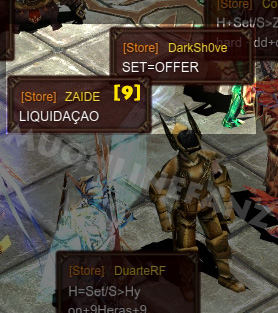
A player with a personal store open...
Character commands... #
You can use character commands to interact with other characters. There are technically two different character command menus. One menu is opened by pressing the [D] key, while the other is opened by pressing [Alt]+[Right-click] on another player. Notable, the menu opened from right-clicking allows you to view another character's hunting log and also allows you to assign your MU Helper with the other player.
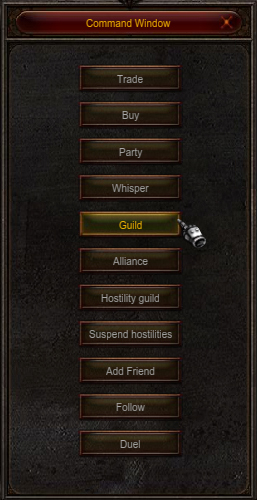
[D] menu...
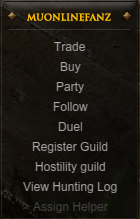
[Alt]+[Right-click] menu...
Warp command window... #
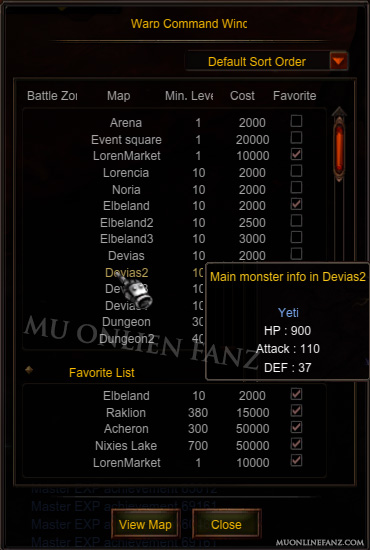
Use the warp command to quickly move from map to map!
- Hot-key: [M]
- All characters can use this feature to instantly move to another Map.
- It cost Zen, as a fee, to use this feature.
- Most Maps can be entered for free, if you choose to walk there instead.
- Each Map has a unique Character Level requirement to enter, and to use the Warp Command.
- You can set Favorite Maps by clicking the check box in the Warp Command Menu.
- Favorite Maps will always be listed at the bottom, for easy use.
- Up to 5 Favorite Maps can be set; uncheck any check box to remove a Map from the Favorite Maps list.
- The Maps on the list can be sorted by Monster Level or by alphabetical order.
- Hovering over a Map name will display general information about a monster in that area.
Gremory Case... #
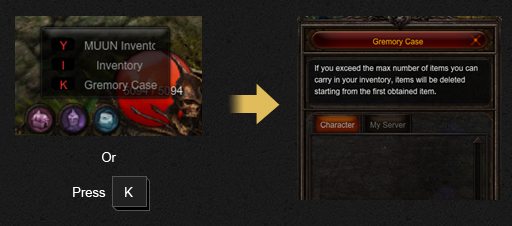
Rewards you've earned from completing mini-games and events are sent to the gremory case. Make sure to claim your items as soon as possible because after a while the items in the gremory case will expire and be deleted forever!
- Hot-key: [K]
- The Gremory Case stores rewards items from Mini-games and Events.
- Items stored in the Gremory Case have an expiration date.
- Items will be deleted if they are not claimed by the expiration date.
- A maximum of 50 items can be stored in the Gremory Case.
- Character storage tab displays items acquired through that specific character.
- Rewards from the following Mini-games will be stored in the Gremory Case:
- Chaos Castle
- Blood Castle
- Devil's Square
- Illusion Temple
- Doppelganger
- Maze of Dimension
Chat box... #
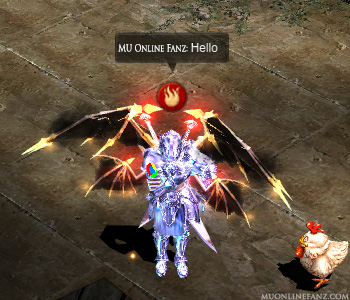
Press [Enter] to type a public message to other players! You can also send a variety of private messages to groups of players or even directly to another player through a 'whisper!'

- You can send messages in different chat channels:
- Public: these messages can be seen by anyone nearby.
- Whisper: these messages can only be seen by a single player:
- with the chat box open press [Tab] to enter the character's name you want to whisper message.
- Party: these messages can be seen by party members.
- Gens: these messages can be seen by Gens members.
- Guild: these messages can be seen by guild members.
- Guild Alliance: these messages can be seen by guild alliance members.
- You can send messages to specific channels quickly from the public channel by adding a symbol in front of a message:
- Type ~ to send a message to the party channel.
- Type @ to send a message to the guild channel.
- Type @@ to send a message to the guild alliance channel.
- Type $ to send a message to the Gens channel.
- For example, typing "~Hi guys!" in the public channel would send the message only to the party channel.
- You can also type # in front of a message to make a public message appear above the character's head longer.
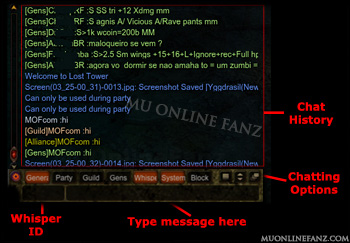
- [F2]: open the message blocking list.
- [F3]: toggles the display of whisper messages.
- [F4]: change the size of the chat window.
- [F5]: toggles the display of the chat window:
- default view with the background
- default view without the background
- displays only system messages with the background
- displays only system messages without the background
- [F9]: toggles the display ofGens messages.
- [F10]: toggles the display of public messages.
- [F11]: scrolls the chat window to the most recent message.
- [F12]: toggles the display of guild messages.
Emotes... #
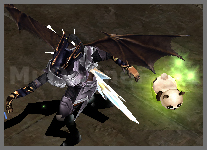
Emotes are performed by typing key-words in the chat. Additionally, you can hide the text by typing "/" in front of a key-word. (The key-words are case sensitive.) For example: "/Hello"

- Bow: Hi Hello Welcome Thanks
- Wave: Goodbye Bye
- Laugh: Haha Hehe Hoho ^^ ^_^ ^.^
- Scratch head: Sorry ;
- Cross arms: Huh Pooh -.- -_-
- Wave arms in the air: Great
- Arm thrust: OK Again
- Slow arm thrust: Victory Win
- Point ahead: There That
- Point weapon ahead: Rush
- Clap with arm thrust: Cheer
- Shiver: Cold
- Beckon: Come Here
- Shake head: Cry Sad T_T
- Refuse: Never Not
- Clap hands: Good Wow Nice
- Kneel: Respect Defeated
- Salute: Sir
- Pelvic thrust: Hustle
- Dance: Dance
- Examine: Look around
- Yawn: Tired Sleepy
- Taunt: Come on
Friends list & mail box... #
You can add players as a friend to be able to see when each other are online and to send private messages to each other. You can also send mail to any character in the game through the mail box system. Mail can be sent to other players even when they are offline. If you get a new mail, a notification icon will appear on the screen.
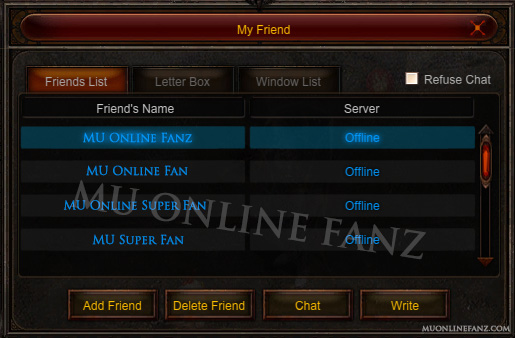
Friend list window...
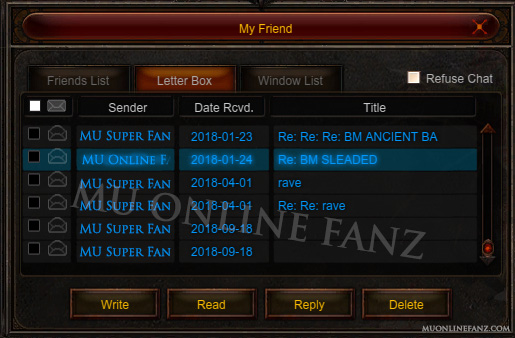
Mail box window...
Options Menu... #
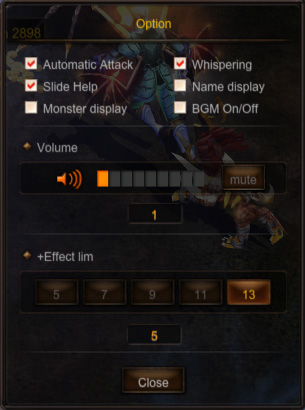
Use the options menu to change various in-game settings.
- Hot-key: [O]
- Automatic Attack: when attacked by a monster, the character will automatically attack back.
- Slide Help: toggles the display of the help information displayed at the top of the game client.
- Monster Display: toggles the display of monster names.
- Whispering: toggles the sound effect of Whisper messages.
- Name Display: toggles the display of Character Names.
- BGM On/Off: toggles background music on or off.
- Mute: mutes all client sound effects and music.
- +Effect Limit: limits the graphical intensity of items with a high Item Level.
Play guide... #
You can open an in-game guide created by Webzen by pressing [F1]. However, the guides usually have out dated information. You can take a live look through their guide here, displayed below...
Published by IZAKTLY
All Rights Reserved || Copyright © 2012 ~ 2026
MU Online Fanz is a fan-made resource operated under permission from Webzen Inc. All MU Online content is property of Webzen Inc. Information provided on this site is for educational and entertainment purposes only. Use at your own discretion.
WEBZEN IP, game content, and materials are trademarks and copyrights of Webzen Inc., and its Licensors, and is used with permission. © Webzen Inc. All rights reserved. The MU logo and the Webzen logo are trademarks of Webzen Inc.
