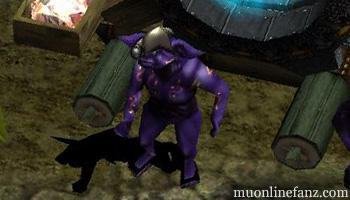
Overview:
- Crafting NPC
- Location:
- Noria @(180, 102)
Located in Noria, the Chaos Goblin Machine is used for crafting and upgrading items! The machine, which is managed by Goblins, is entirely powered with Jewels of Chaos. The machine is an ancient construction which converts jewels in order to manipulate, combine, and craft entirely new items! However, the technology isn't necessarily stable, and therefore it can occasionally destroy items during a combination. Either way, it will be one of the most useful NPCs in the game!
Click to jump 👇
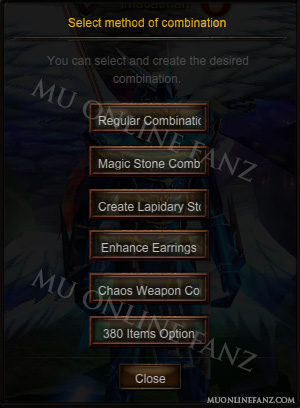
Equipment Upgrades & Transformations:
Show Wings & Cape Crafting...
Show Fenrir Crafting...
Show More Crafting...
# +Item Level Upgrades
# Mastery Weapon Transformations
# Mastery Set Transformations
# Mastery Set Conversion
# Add +Jewel of Guardian Option
# Archangel Weapon Transformation
# Earring Upgrades
# Earring Transformations
Show Wings & Cape Crafting...
Show Fenrir Crafting...
Show More Crafting...
- Talisman of Luck increases crafting success rate.
- Talisman of Chaos Assembly protects the main item used in the combination from disappearing, if crafting were to fail.
- Elemental Talisman of Luck increases crafting success rate for Pentagrams.
- Elemental Talisman of Chaos Assembly protects Pentagram items from disappearing, if crafting were to fail.
- Mass combination allows some items to be crafted in multiple quantities by adding additional quantities of crafting ingredients.
Most equipment items can have their +Item Level increased up to +15!
Jewel of Bless
- 100% Success Rate
Jewel of Soul
- 60% Success Rate:
- Excellent item: 50%
- Ancient item: 50%
- Socket item: 40%
Jewel of Soul
- 60% Success Rate:
- Excellent item: 50%
- Ancient item: 50%
- Socket item: 40%
- 60% Success Rate:
- Excellent item: 50%
- Ancient item: 50%
- Socket item: 40%
- Required ingredients:
- Item +9
- Jewel of Soul
- Jewel of Bless
- Jewel of Chaos
- Zen x2,000,000
- 60% Success Rate:
- Excellent item: 50%
- Ancient item: 50%
- Socket item: 40%
- Required ingredients:
- Item +10
- Jewel of Soul x2
- Jewel of Bless x2
- Jewel of Chaos
- Zen x4,000,000
- 55% Success Rate:
- Excellent item: 45%
- Ancient item: 45%
- Socket item: 35%
- Required ingredients:
- Item +11
- Jewel of Soul x3
- Jewel of Bless x3
- Jewel of Chaos
- Zen x6,000,000
- 55% Success Rate:
- Excellent item: 45%
- Ancient item: 45%
- Socket item: 35%
- Required ingredients:
- Item +12
- Jewel of Soul x4
- Jewel of Bless x4
- Jewel of Chaos
- Zen x8,000,000
- 50% Success Rate:
- Excellent item: 40%
- Ancient item: 40%
- Socket item: 30%
- Required ingredients:
- Item +13
- Jewel of Soul x5
- Jewel of Bless x5
- Jewel of Chaos
- Zen x10,000,000
- 50% Success Rate:
- Excellent item: 40%
- Ancient item: 40%
- Socket item: 30%
- Required ingredients:
- Item +14
- Jewel of Soul x6
- Jewel of Bless x6
- Jewel of Chaos
- Zen x12,000,000
- If the combination succeeds:
- The item's level increases by one.
- All other items in the combination are consumed.
- If combination fails on +1 ~ +7 Upgrade:
- The item's level decreases by one.
- Jewel is destroyed.
- If combination fails on +8 or +9 Upgrade:
- The item's level resets to +0.
- Jewel is destroyed.
- If combination fails on +10 ~ +15 Upgrade:
- All items in the combination are destroyed.
- Success Rates increase by 25% for any item with +Luck.
- Talisman of Luck and Talisman of Chaos Assembly can be used for +10 Upgrade and higher.
- You can also upgrade items up to +9 by drag-and-drop jewels on the item.
Mastery weapons are upgraded through a series of transformations to improve the item.
- 100% Success Rate
- Required ingredients:
- Mastery weapon +11 [+16 DMG]
- Anvil item*
- Jewel of Bless x30
- Jewel of Soul x30
- Jewel of Creation
- Jewel of Chaos
- If the combination succeeds:
- The next tier mastery weapon is created.
- The new mastery weapon will be +0 item level.
- The new mastery weapon will have +0 Life Option.
- +Luck, +Skill, and +Exc Option are transfered from the main item used in the combination.
- All other items in the combination are consumed.
- The combination cannot fail
- Bloodangel ➡ Darkangel: requires Darkangel Anvil.
- Darkangel ➡ Holyangel: requires Holyangel Anvil.
- Holyangel ➡ Soul: requires Soul Anvil.
- Soul ➡ Blue Eye: requires Blue Eye Anvil.
- Blue Eye ➡ Silver Heart: requires Silver Heart Anvil.
- Silver Heart ➡ Manticore: requires Manticore Anvil.
- Manticore ➡ Brilliant: requires Brilliant Anvil.
- The Mastery Item in the combination requires +11 item level.
- The Mastery Item in the combination requires +16 Life Option.
- The Anvil Item used in the combination is sold via NPC Priest James. (x100,000 Ruud each)
Mastery ancient set items are upgraded through a series of transformations to improve the item.
- 100% Success Rate
- Required ingredients:
- [Sealed] Bloodangel set item
- Bloodangel Soul*
- Jewel of Bless x30
- Jewel of Soul x30
- Jewel of Creation
- Jewel of Chaos
- 100% Success Rate
- Required ingredients:
- Bloodangel set item +11 [+16 DEF]
- Darkangel Soul
- Jewel of Bless x10
- Jewel of Soul x10
- Jewel of Creation
- Jewel of Chaos
- 100% Success Rate
- Required ingredients:
- Darkangel set item +11 [+16 DEF]
- Holyangel Soul
- Jewel of Bless x30
- Jewel of Soul x30
- Jewel of Creation
- Jewel of Chaos
- 100% Success Rate
- Required ingredients:
- Mastery set item +11 [+16 DEF]
- Soul item*
- Jewel of Bless x30
- Jewel of Soul x30
- Jewel of Creation
- Jewel of Chaos
- Bloodangel ➡ Darkangel: requires Darkangel Soul.
- Darkangel ➡ Holyangel: requires Holyangel Soul.
- Holyangel ➡ Soul: requires Awakening Soul.
- Soul ➡ Blue Eye: requires Frosty Soul.
- Blue Eye ➡ Silver Heart: requires Silver Heart Soul.
- Silver Heart ➡ Manticore: requires Manticore Soul.
- Manticore ➡ Brilliant: requires Brilliant Soul.
- If the combination succeeds:
- The next tier mastery set item is created.
- The new mastery set item will be +0 item level.
- The new mastery set item will have +0 Life Option.
- +Luck and +Exc Option are rerolled when transforming from Bloodangel ➡ Darkangel.
- Otherwise, the +Luck and +Exc Option are transfered from the main item used in the combination.
- All other items in the combination are consumed.
- The combination cannot fail
- The Mastery Item in the combination requires +11 item level.
- The Mastery Item in the combination requires +16 Life Option.
- The Soul item used in the combination is sold via NPC Priest James. (x50,000 Ruud each)
Mastery set items can be converted between character build types. For example, some character have items for both attack and defensive builds. With item conversion, you can switch the build style from one type to the other.
- 100% Success Rate
- Required ingredients:
- Mastery set item
- Conversion Order
- Jewel of Bless x10
- Jewel of Soul x10
- Jewel of Chaos
- If the combination succeeds:
- The mastery set item is converted to the opposite build type.
- The item's level and additional options do not change.
- All other items in the combination are consumed.
- The combination cannot fail
Dark Knight class:
- Fury's Bloodangel ↔ Defensive Bloodangel
- Courage's Darkangel ↔ Faithful Darkangel
- Protect's Holyangel ↔ Conversive's Holyangel
- Awakening Soul ↔ Awakening Soul (Belief)
- Frosty Blue Eye ↔ Frosty Blue Eye (Belief)
- Forefather's Silver Heart ↔ Forefather's Silver Heart (Belief)
- Roaring Manticore ↔ Roaring Manticore (Belief)
- Heavenly Brilliant ↔ Heavenly Brilliant (Belief)
Elf class:
- Flurry's Bloodangel ↔ Salvation's Bloodangel
- Speed's Darkangel ↔ Resurgen's Darkangel
- Blessing's Holyangel ↔ Healing's Holyangel
- Awakening Soul (ATK) ↔ Awakening Soul (ENE)
- Frosty Blue Eye (ATK) ↔ Frosty Blue Eye (ENE)
- Forefather's Silver Heart (ATK) ↔ Forefather's Silver Heart (ENE)
- Roaring Manticore (ATK) ↔ Roaring Manticore (ENE)
- Heavenly Brilliant (ATK) ↔ Heavenly Brilliant (ENE)
Magic Gladiator class:
- Extremity's Bloodangel ↔ Captivation's Bloodangel
- Determination's Darkangel ↔ Fallen's Darkangel
- Solid's Holyangel ↔ Determined's Holyangel
- Awakening Soul (ATK) ↔ Awakening Soul (ENE)
- Frosty Blue Eye (ATK) ↔ Frosty Blue Eye (ENE)
- Forefather's Silver Heart (ATK) ↔ Forefather's Silver Heart (ENE)
- Roaring Manticore (ATK) ↔ Roaring Manticore (ENE)
- Heavenly Brilliant (ATK) ↔ Heavenly Brilliant (ENE)
- The Conversion Order item used in the combination is sold via NPC Priest James. (up to x30,000 Ruud each)
A Jewel of Guardian can be used to add special PVP bonus options to Siege Items!
Required ingredients:
- Siege Item +4
- Jewel of Guardian
- Jewel of Chaos
- Zen x10,000,000
80% success rate max
- Item +4 ~ +6: 50%
- Item +7 ~ +9: 60%
- Item +10 ~ +13: 70%
- Item +14 ~ +15: 80%
- If the combination succeeds:
- +Jewel of Guardian Option is added to the Siege Item.
- All other items in the combination are consumed.
- If the combination fails:
- The Siege Item does not change.
- All other items in the combination are destroyed.
- The item in the combination must have an item level of at least +4.
Archangel weapons can be transformed into powerful Blessed Archangel weapon items! However, you'll need to first craft the Archangel's Hammer!
- 100% success rate
- Archangel Item +15 [+16] [+FO]
- Archangel's Hammer
- Jewel of Bless x30
- Jewel of Soul x30
- Jewel of Life x30
- Jewel of Chaos x30
- If the combination succeeds:
- Blessed Divine Archangel item is created.
- All items used in the combination are consumed.
- The combination cannot fail.
- Archangel Hammer is a craftable item at NPC Chaos Goblin Machine.
Earrings can have their +Item Level increased up to +15! You'll need to use Lapidary Stones to attempt upgrading them!
- If the combination succeeds:
- The earring's item level increases by one.
- All other items in the combination are consumed.
- If combination fails on +1 ~ +7 upgrade:
- The earring's item level decreases by one.
- All other items in the combination are destroyed.
- If combination fails on +8 ~ +15 upgrade:
- The earring's item level resets to +0.
- All other items in the combination are destroyed.
- Talisman of Luck and Talisman of Chaos Assembly can be used to increase success rate.
- Talisman of Chaos Assembly can be used for +10 Upgrade and higher.
Earrings can be transformed into even more powerful earrings!
Required ingredients:
- Earring +11*
- Casting Mold item
- Jewel of Soul x20
- Jewel of Bless x20
- Jewel of Creation x1
- Jewel of Chaos x1
Success rate increases when transforming an earring item with higher +Item Level.
- Item +11: 60% chance
- Item +12: 70% chance
- Item +13: 80% chance
- Item +14: 90% chance
- Item +15: 100% chance
Required Casting Mold item...
- Wrath ➡ Forefather's requires Forefather's Casting Mold.
- Forefather's ➡ Glory requires Glory Casting Mold.
- Glory ➡ Blood requires Blood Casting Mold.
- Blood ➡ Allurement requires Allurement Casting Mold.
On crafting success...
- Earring transforms into the next tier:
- '+Item Level' will be +0.
- '+Earring Options' are rerolled.
- All other items in the combination disappear.
On crafting failure...
- Earring '+Item Level' decreases to +0.
- All other items in the combination disappear.
Notes & Tips...
- Casting Molds are sold via NPC Priest James. (x25,000 Ruud each)
Wings are essential to your survival in Mu! You'll want to be sure you're able to craft the wing item you will need before you really need them! 🦋
- 100% Success Rate max
- Required ingredients:
- Weapon +4 [+OPT]*
- Jewel of Chaos
- Zen x10,000 ~ x1,000,000
- 100% Success Rate max
- Required ingredients:
- Chaos Weapon +4 [+OPT]
- Jewel of Chaos
- Lower Magic Stone*
- Zen x10,000 ~ x1,000,000
- If the combination succeeds:
- Chaos Weapon: One random Chaos Weapon is created and randomly rolls +Item Level, +Life Option, +Luck, and +Skill options.
- T1 Wings: One random wing item is created with +0 item level and randomly rolls +Wing Option, +Life Option, and +Luck.
- All other items in the combination are consumed.
- If combination fails:
- All items in the combination are destroyed.
Chaos Weapon:
- The base success rates are based on the main item's Zen value.
- The Lower Magic Stone is not required to attempt to craft T1 Wings.
- There is no limit to the amount of Magic Stones you can use in the combination.
T1 Wings can be transformed into either T2 Wings or Cape items!
- 90% Success Rate max
- Required ingredients:
- T1 Wings
- Loch's Feather
- Jewel of Chaos
- Medium Magic Stone*
- Zen x5,000,000
- 90% Success Rate max
- Required ingredients:
- T1 Wings
- Monarch's Crest
- Jewel of Chaos
- Medium Magic Stone*
- Zen x5,000,000
- If the combination succeeds:
- T2 Wings: One random wing item is created with +0 item level and randomly rolls +Wing Option, +Life Option, and +Luck.
- T2 Cape: One random cape item is created with +0 item level and randomly rolls +Wing Option, +Life Option, and +Luck.
- If combination fails:
- All items in the combination are destroyed.
- The Magic Stone is not required to attempt crafting.
- There is no limit to the amount of Magic Stones you can use in the combination.
T3 Wings and Cape items are powerful mastery equipment! As such, they can be a bit tricky to craft!
- 60% Success Rate max
- Required ingredients:
- T2 Wings +9 [+OPT]
- Jewel of Soul x10
- Jewel of Creation
- Jewel of Chaos
- Higher Magic Stone*
- Zen x12,000,000
- 40% Success Rate max
- Required ingredients:
- Condor Feather
- Condor Flame
- Jewel of Bless x30
- Jewel of Soul x30
- Jewel of Creation x30
- Jewel of Chaos x30
- Medium Magic Stone*
- Zen x1,000,000 ~ 8,000,000
- If the combination succeeds:
- Condor Feather: one item is created.
- T3 Wings & Capes: One random item is created with +0 item level and randomly rolls +Wing Option, +Life Option, and +Luck.
- All other items in the combination are consumed.
- If combination fails:
- All items in the combination are destroyed.
- When crafting Condor Feather, the base success rate is based on the wing item's Zen value.
- There is no limit to the amount of Magic Stones you can use in the combination.
- Condor Flame can be obtained from killing monsters in the Balgass Barracks.
T4 Wings and Cape items can only be equipped after level 800! They are extremely difficult to craft!
- 60% Success Rate max
- Required ingredients:
- T3 Wings +13 [+OPT]
- Jewel of Bless x30
- Jewel of Soul x30
- Jewel of Creation x30
- Jewel of Chaos x30
- Higher Magic Stone*
- Zen x14,000,000
- 40% Success Rate max
- Required ingredients:
- Garuda's Feather
- Garuda's Flame
- Golden Crests x50
- Jewel of Bless x30
- Jewel of Soul x30
- Jewel of Creation x30
- Jewel of Chaos x30
- Higher Magic Stone*
- Zen x1,000,000 ~ 8,000,000
- If the combination succeeds:
- Garuda's Feather: one item is created.
- T4 Wings & Capes: one random item is created with +0 item level and randomly rolls +Wing Option, +Life Option, and +Luck.
- All other items in the combination are consumed.
- If combination fails:
- All items in the combination are destroyed.
- When crafting Garuda's Feather, the base success rate is based on the wing item's Zen value.
- There is no limit to the amount of Magic Stones you can use in the combination.
- Garuda's Flame can be obtained from ?.
- Golden Crests can be obtained from ?.
You can create bound T2 or T3 wing items at a 100% success rate! You'll need to purchase a Magic Solution from NPC Priest James to start!
- 100% Success Rate
- Required ingredients:
- T1 Wings
- Finished Loch Magic Potion
- Zen x100,000
- 100% Success Rate
- Required ingredients:
- Condor Feather
- Condor Flame
- Finished Condor Magic Potion
- Zen (x?)
- If the combination succeeds:
- One random wing item is created with +0 item level and randomly rolls +Wing Option, +Life Option, and +Luck.
- All other items in the combination are consumed.
- If combination fails:
- All items in the combination are destroyed.
[Bound] T2 Wings:
[Bound] T3 Wings & Capes:
- The crafted item is [Bound] and cannot be traded, however it can be stored in the vault.
- Magic Solution can be purchased from NPC Priest James.
- Magic Solution can become finished by picking up Magic Bubbles.
- Loch Magic Bubble is dropped by monsters between Monster Level 75 ~ 100.
- Condor Magic Bubble is dropped by monsters between Monster Level 95 ~ 200.
- In order to pick up Magic Bubble, the corresponding Magic Solution must be in your character's Inventory.
- Place Magic Bubble into the Magic Solution in order to fill up the solution.
- Once the Magic Solution is filled 100%, it will turn into Finished Magic Solution.
Fenrirs are huge beasts that can be summoned and used as a mount! They'll increase your character's movement speed and give additional combat bonuses! They also look pretty cool! 😎
- 70% Success Rate
- Required ingredients:
- 30% Success Rate
- Required ingredients:
- Broken Horn
- Jewel of Life x3
- Jewel of Chaos
- Zen x10,000,000
- If the combination succeeds:
- One item is created.
- All other items in the combination are consumed.
- If combination fails:
- All items in the combination are destroyed.
- Armor Splinter, Guardian's Blessing, and Beastly Claw can be obtained by killing monsters in the Crywolf map.
- Mass combination is possible.
Fenrirs can be transformed to add an additional option which will either increase your character's DMG or DEF!
- 79% Success Rate max
- +?% per Magic Stone
- Required ingredients:
- Any weapon item
- Any Magic Stone
- Horn of Fenrir
- Jewel of Life x5
- Jewel of Chaos
- Zen x10,000,000
- 79% Success Rate max
- +?% per Magic Stone
- Required ingredients:
- Any armor item
- Any Magic Stone
- Horn of Fenrir
- Jewel of Life x5
- Jewel of Chaos
- Zen x10,000,000
- If the combination succeeds:
- The Horn of Fenrir is transformed and an additional option is added.
- All other items in the combination are consumed.
- If combination fails:
- All items in the combination are destroyed.
- You are only required to use one Magic Stone in the combination.
- Adding additional Magic Stones will increase the success rate.
- Using higher grade Magic Stones will increase the success rate more.
- The weapon/armor item used in the combination affects the success rate depending on its Zen value.
There are a handful of potions that can be crafted at the Chaos Goblin Machine!
- If the combination succeeds:
- SD Potion: one potion is created.
- Potion of Soul/Blessing: ten potions are created.
- All other items in the combination are destroyed.
- If combination fails:
- All items in the combination are destroyed.
- Mass combination is possible.
In order to enter certain mini-games you will need to craft an entry ticket item first!
- 80% Success Rate
- Required ingredients:
- Devil's Key
- Devil's Eye
- Jewel of Chaos
- Zen x2,000,000
- 80% Success Rate
- Required ingredients:
- Archangel Scroll
- Blood Bone
- Jewel of Chaos
- Zen x2,000,000
- 80% Success Rate
- Required ingredients:
- Illusion Sorcerer's Covenant
- Old Scroll
- Jewel of Chaos
- Zen x2,000,000
- If the combination succeeds:
- One entry ticket item is created.
- All other items in the combination are consumed.
- If combination fails:
- All items in the combination are destroyed.
- The items used in the combination must have matching +Item Level.
- Success Rate increases by +5% when crafting in the Event Square map!
- Mass combination is possible.
Magic Stones are needed for various crafting recipes! They can be crafted here, at the Chaos Goblin Machine.
- 100% Success Rate
- Required ingredients:
- Item +6* [+OPT]
- 100% Success Rate
- Required ingredients:
- Excellent item +7* [+OPT]
- 100% Success Rate
- Required ingredients:
- Ancient item +7* [+OPT]
- If the combination succeeds:
- Magic Stone items are created depending on the "Outcome" displayed in the crafting window.
- All other items in the combination are consumed.
- The combination can fail if the "Outcome" displayed in the crafting window reads "(x0) ~ (x0)" or "(x0) ~ (x1)".
- If the combination were to fail, all items in the combination are destroyed.
- Items used in the combination must have +Life Option.
- Items with higher Zen value will craft larger amounts of Magic Stones.
- The combination can fail if the Zen value of items in the combination are not high enough.
- An item's Zen value greatly increases from:
- High +Item Level
- Upgrading +Jewel of Life Option
- Items with multiple +Exc Options
- Success Rate example:
- Outcome: Magic Stone (x0) ~ (x0)
- There is a 0% Success Rate.
- Outcome: Magic Stone (x0) ~ (x1)
- There is a chance of failure.
- Outcome: Magic Stone (x1) ~ (x2)
- There is a 100% Success Rate.
- Outcome: Magic Stone (x0) ~ (x0)
Here is a list of other possible craftable items...
- 80% Success Rate
- Required ingredients:
- Ancient item +11*
- 100% Success Rate
- Required ingredients:
- Jewel of Soul x5
- Jewel of Bless x5
- Jewel of Guardian
- Jewel of Chaos
- Zen x5,000,000
- 100% Success Rate
- Required ingredients:
- Steel of Heaven x10
- Jewel of Soul x10
- Jewel of Bless x10
- Jewel of Creation
- Jewel of Guardian
- Jewel of Chaos
- Zen x10,000,000
- 100% Success Rate
- Crafts one Lapidary Stone:
- Jewel of Chaos x10
- Jewel of Soul x10
- Jewel of Life x10
- Jewel of Creation x10
- Jewel of Harmony x10
- Jewel of Guardian x10
- Crafts two Lapidary Stones:
- Excellent Ring x2
- Crafts three Lapidary Stones:
- Excellent Pendant x2
- Crafts four Lapidary Stones:
- Earring x2
- If the combination succeeds:
- One item is created.
- All other items in the combination are consumed.
- If combination fails:
- All other items in the combination are destroyed.
- Mass combination is possible.
- Steel of Heaven, which is used to craft Archangel's Hammer, is only obtainable during promotional events.
b2023.09.11.001
Published by IZAKTLY

All Rights Reserved || Copyright © 2012 ~ 2026
MU Online Fanz is a fan-made resource operated under permission from Webzen Inc. All MU Online content is property of Webzen Inc. Information provided on this site is for educational and entertainment purposes only. Use at your own discretion.
WEBZEN IP, game content, and materials are trademarks and copyrights of Webzen Inc., and its Licensors, and is used with permission. © Webzen Inc. All rights reserved. The MU logo and the Webzen logo are trademarks of Webzen Inc.